一 BIO
同步并阻塞(传统阻塞型),服务器实现模式为一个连接一个线程,即客户端有连接请求时服务器端就需要启动一个线程进行处理.
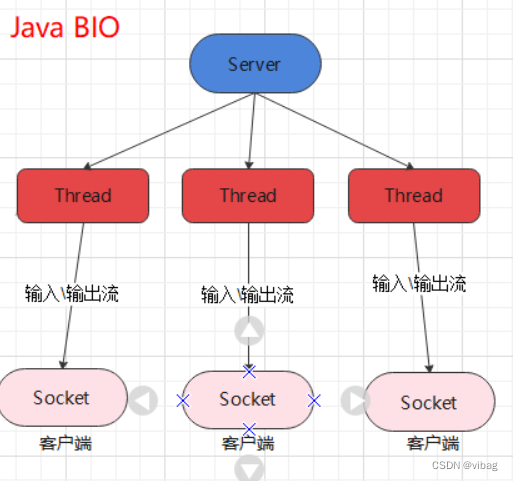
BIO(Blocking I/O,阻塞I/O)模式是一种网络编程中的I/O处理模式。在BIO模式中,当线程执行I/O操作(如读写数据)时,线程会被阻塞,直到I/O操作完成。这意味着,当一个线程在等待I/O操作完成时,其他线程必须等待,导致线程的并发性能较低。
BIO模式的主要特点如下:
- 同步I/O操作:线程在执行I/O操作时会阻塞,直到操作完成。
- 适用于短连接:BIO模式适用于连接数较少且连接时间较短的场景,因为在这种场景下,线程阻塞的时间相对较短,对系统性能的影响较小。
- 实现简单:BIO模式的实现相对简单,因为线程在执行I/O操作时只需等待操作完成即可。
同步阻塞案例
服务端代码实现
public class Server {
    public static void main(String[] args) throws Exception {
        System.out.println("==服务器的启动==");
        // 注册端口
        ServerSocket serverSocket = new ServerSocket(8888);
       //获取客户端的连接
        Socket socket = serverSocket.accept();
        //从Socket管道中得到一个字节输入流
        InputStream is = socket.getInputStream();
        //把字节输入流封装成字符缓冲流
        BufferedReader br = new BufferedReader(new InputStreamReader(is));
        // 读取数据
        String line ;
        while((line = br.readLine())!=null){
            System.out.println("服务端收到:"+line);
        }
    }
}
客户端代码实现
public class Client {
    public static void main(String[] args) throws Exception {
        System.out.println("启动客户端");
        // 创建Socket的通信管道,请求与服务端的端口连接。
        Socket socket = new Socket("127.0.0.1",8888);
        // 从Socket通信管道中得到一个字节输出流。
        OutputStream os = socket.getOutputStream();
        // 把字节流封装成打印流
        PrintStream ps = new PrintStream(os);
        // 发送消息
        ps.println("客户端已完成消息发送");
        ps.flush();
    }
}
在通信这种通信方式中,服务端会一直等待客户端的消息,若客户端没有进行消息的发送,那么服务端将一直进入阻塞状态。
同时服务端是按照行获取消息的,这意味着客户端也必须按照行进行消息的发送,否则服务端将进入等待消息的阻塞状态。
BIO模式消息多发多收实现
服务端代码实现**:
public class Server {
    public static void main(String[] args) {
        try {
            System.out.println("服务端开始启动");
            //1 定义ServerSocket对象的端口注册
            ServerSocket serverSocket = new ServerSocket(9999);
            //2 监听客户端的Socket连接请求
            Socket socket = serverSocket.accept();
            //3 从socket管道中得到字节输入流对象,读取客户端发送过来的数据
            InputStream inputStream = socket.getInputStream();
            //4  为了方便按照行来读取数据,把字节输入流包装成缓冲的字符输入流
            BufferedReader reader = new BufferedReader(new InputStreamReader(inputStream));
            String msg;
            //按照行来读取数据
            while((msg = reader.readLine()) != null){
                System.out.println("服务器收到客户端的消息:"+msg);
            }
            //关闭连接
            reader.close();
        } catch (IOException e) {
            e.printStackTrace();
        }
    }
}
客户端代码实现:
public class Client {
    public static void main(String[] args) {
        Socket socket = null;
        try {
            //1 创建socket对象请求服务端的连接,端口需要和服务端保持一致
            socket = new Socket("127.0.0.1", 9999);
            //2 从socket对象获得字节输出流对象
            OutputStream outputStream = socket.getOutputStream();
            //3 将字节输出流封装成打印流
            PrintStream printStream = new PrintStream(outputStream);
            Scanner sc = new Scanner(System.in);
            while(true) {
                System.out.print("发送消息:");
                String msg = sc.nextLine();
                printStream.println(msg);
                printStream.flush();
            }
        } catch (IOException e) {
            e.printStackTrace();
        }
    }
}
在以上代码中,由于服务端这边这边只有一个线程,所以服务端每次只能接收一个客户端的通信请求,若需要处理多个客户端的通信请求,可以在服务端引入多线程,每当到达一个客户端请求到达服务端,服务端就创建一个新的线程来处理这个客户端的请求,此时服务端就可以处理多个客户端请求。需要修改服务端的代码以及增加一个服务端线程处理类
服务端线程处理类代码实现:
public class ServerThread extends Thread{
    private Socket socket;
    public ServerThread(Socket socket){
        this.socket = socket;
    }
    public void run(){
        try {
            InputStream inputStream = socket.getInputStream();
            BufferedReader br = new BufferedReader(new InputStreamReader(inputStream));
            String msg;
            while((msg = br.readLine()) != null){
                System.out.println("服务端收到客户端消息:"+msg);
            }
            br.close();
        } catch (IOException e) {
            e.printStackTrace();
        }

    }
}
服务端代码实现:
public class Server {
    public static void main(String[] args) {
        try {
            ServerSocket serverSocket = new ServerSocket(9999);
            System.out.println("服务端启动");
            while(true){
                Socket socket = serverSocket.accept();
                //将客户端的请求交由新创建的线程处理
                new ServerThread(socket).start();
            }
        } catch (IOException e) {
            e.printStackTrace();
        }
    }
}
总结:
1 每当接收到一个Socket连接就会创建一个新的线程,线程的竞争以及上下文切换会影响性能;
2 每个线程都会占用栈空间和CPU资源;
3 并不是每个socket都进行IO操作,无意义的线程处理(即使客户端没有消息,服务端的线程也会阻塞等待);
4 客户端的并发访问增加时。服务端将呈现1:1的线程开销,访问量越大,系统将发生线程栈溢出,线程创建失败,最终导致进程宕机或者僵死,从而不能对外提供服务。
二 NIO
NIO是Java中处理IO操作的一种现代方法,它通过引入通道、缓冲区和选择器等概念,与传统的BIO(Blocking Input/Output,阻塞输入/输出)模型相比,NIO提供了更高的性能和更好的资源利用率,特别是在处理大量并发连接时。
NIO核心组件
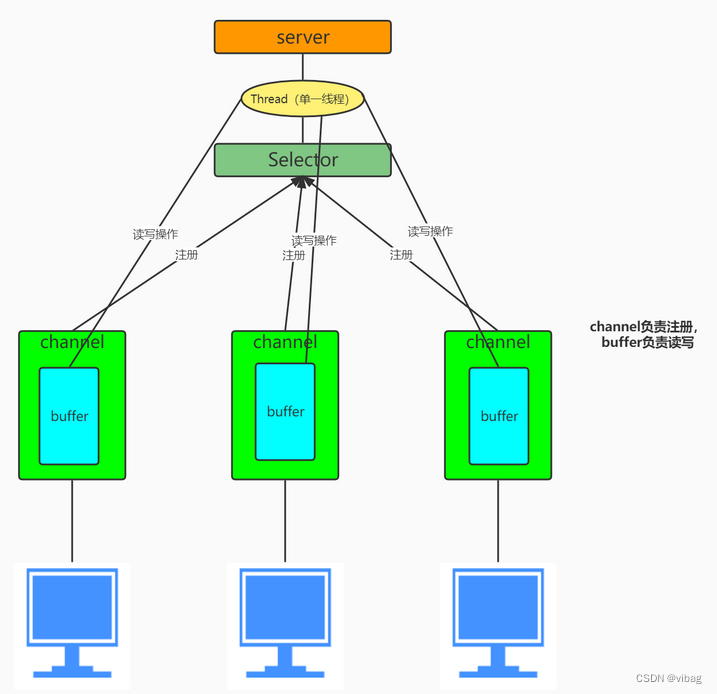
NIO包含以下三个核心组件:
- 缓冲区(Buffer):缓冲区本质上是一个数组,但它提供了更强大的功能,如自动增长和定位读写位置。所有数据都必须通过缓冲区进行处理。
- 通道(Channel):通道是双向的,可以同时进行读和写操作的对象。它类似于流,但比流更灵活,因为它可以与缓冲区直接交互。
- 选择器(Selector):选择器是多路复用器,它可以检查一个或多个通道的状态,例如是否有数据可读或可写。这样,单个线程就可以处理多个网络连接的IO操作。
Buffer(缓冲区)
Buffer在NIO中是一个顶层的抽象类, 类的层级关系图如下,常用的缓冲区分别对应
ByteBuffer,CharBuffer,ShortBuffer,IntBuffer,LongBuffer,FloatBuffer,DoubleBuffer 7种.

- capacity:Buffer的容量,即Buffer可以存储的最大数据量。一旦Buffer被创建,其容量就不能改变。
- position:Buffer中下一个要被读取或写入的元素的索引。position属性的值在0到capacity-1之间。
- limit:Buffer中第一个不能被读取或写入的元素的索引。limit属性的值在0到capacity之间。
- mark:一个可选的索引,用于记住某个位置,以便之后可以回到这个位置。mark属性的值在0到capacity-1之间。
标记、位置、限制、容量满足以下不变式: 0 <= mark <= position <= limit <= capacity
Buffer中的数据可以通过以下方式进行访问和操作:

Buffer常见方法
Buffer clear() 清空缓冲区并返回对缓冲区的引用
Buffer flip() 为 将缓冲区的界限设置为当前位置,并将当前位置充值为 0
int capacity() 返回 Buffer 的 capacity 大小
boolean hasRemaining() 判断缓冲区中是否还有元素
int limit() 返回 Buffer 的界限(limit) 的位置
Buffer limit(int n) 将设置缓冲区界限为 n, 并返回一个具有新 limit 的缓冲区对象
Buffer mark() 对缓冲区设置标记
int position() 返回缓冲区的当前位置 position
Buffer position(int n) 将设置缓冲区的当前位置为 n , 并返回修改后的 Buffer 对象
int remaining() 返回 position 和 limit 之间的元素个数
Buffer reset() 将位置 position 转到以前设置的 mark 所在的位置
Buffer rewind() 将位置设为为 0, 取消设置的 mark
缓冲区的数据操作
Buffer 所有子类提供了两个用于数据操作的方法:get()put() 方法
取获取 Buffer中的数据
get() :读取单个字节
get(byte[] dst):批量读取多个字节到 dst 中
get(int index):读取指定索引位置的字节(不会移动 position)

放到 入数据到 Buffer 中 中
put(byte b):将给定单个字节写入缓冲区的当前位置
put(byte[] src):将 src 中的字节写入缓冲区的当前位置
put(int index, byte b):将指定字节写入缓冲区的索引位置(不会移动 position)
示例代码
 @Test
    public void test1() {
        String str = "Learning NIO";
        //1. 分配一个固定大小的Buffer缓冲区
        ByteBuffer buf = ByteBuffer.allocate(1024);
        System.out.println("-----------------allocate()----------------");
        System.out.println(buf.position());
        System.out.println(buf.limit());
        System.out.println(buf.capacity());

        //2. 通过put()将数据放入缓冲区中
        buf.put(str.getBytes());
        System.out.println("-----------------put()----------------");
        System.out.println(buf.position());
        System.out.println(buf.limit());
        System.out.println(buf.capacity());

        //3. flip()切换至读数据模式
        buf.flip();
        System.out.println("-----------------flip()----------------");
        System.out.println(buf.position());
        System.out.println(buf.limit());
        System.out.println(buf.capacity());

        //4. 通过get()读取Buffer缓冲区的数据
        byte[] dst = new byte[buf.limit()];
        buf.get(dst);
        System.out.println(new String(dst, 0, dst.length));

        System.out.println("-----------------get()----------------");
        System.out.println(buf.position());
        System.out.println(buf.limit());
        System.out.println(buf.capacity());
        //5. rewind() : 可重复读
        buf.rewind();
        System.out.println("-----------------rewind()----------------");
        System.out.println(buf.position());
        System.out.println(buf.limit());
        System.out.println(buf.capacity());

        //6. clear() : 清空缓冲区,但缓冲区中的数据依然存在,需要覆盖重写
        buf.clear();
        System.out.println("-----------------clear()----------------");
        System.out.println(buf.position());
        System.out.println(buf.limit());
        System.out.println(buf.capacity());
        System.out.println((char) buf.get());
    }
直接内存与非直接内存
ByteBuffer可以是两种类型:直接内存(也就是非堆内存)和非直接内存(也就是堆内存)。
-
直接内存(非堆内存):直接内存是指操作系统分配的内存,而不是Java虚拟机分配的堆内存。直接内存的优点是可以提高I/O操作的性能,因为它可以避免数据在Java虚拟机和操作系统之间的复制。在Java
NIO中,可以使用ByteBuffer.allocateDirect()方法创建一个直接内存的ByteBuffer。 -
非直接内存(堆内存):非直接内存是指Java虚拟机分配的堆内存。在Java
NIO中,可以使用ByteBuffer.allocate()方法创建一个非直接内存的ByteBuffer。
public class BufferExample {
    public static void main(String[] args) {
        // 创建一个直接内存的ByteBuffer,容量为10
        ByteBuffer directBuffer = ByteBuffer.allocateDirect(10);
        // 向直接内存的ByteBuffer中写入数据
        for (int i = 0; i< directBuffer.capacity(); i++) {
            directBuffer.put((byte) i);
        }
        // 切换直接内存的ByteBuffer为读模式
        directBuffer.flip();
        // 从直接内存的ByteBuffer中读取数据
        while (directBuffer.hasRemaining()) {
            System.out.println("Direct buffer: " + directBuffer.get());
        }
        // 创建一个非直接内存的ByteBuffer,容量为10
        ByteBuffer nonDirectBuffer = ByteBuffer.allocate(10);
        // 向非直接内存的ByteBuffer中写入数据
        for (int i = 0; i< nonDirectBuffer.capacity(); i++) {
            nonDirectBuffer.put((byte) i);
        }
        // 切换非直接内存的ByteBuffer为读模式
        nonDirectBuffer.flip();
        // 从非直接内存的ByteBuffer中读取数据
        while (nonDirectBuffer.hasRemaining()) {
            System.out.println("Non-direct buffer: " + nonDirectBuffer.get());
        }
    }
}
使用场景:
-
直接内存(非堆内存):直接内存的优点是可以提高I/O操作的性能,因为它可以避免数据在Java虚拟机和操作系统之间的复制。在进行大量I/O操作时,直接内存的ByteBuffer通常比非直接内存的ByteBuffer更快。此外,直接内存的ByteBuffer还可以与本地代码(如C语言)进行交互,这在某些情况下可能是必要的。因此,
在进行大量I/O操作或需要与本地代码进行交互时,直接内存的ByteBuffer是一个更好的选择。 -
非直接内存(堆内存):非直接内存的优点是可以更好地利用Java虚拟机的垃圾回收机制。在Java虚拟机中,堆内存是由垃圾回收器管理的,因此使用非直接内存的ByteBuffer可以避免内存泄漏和其他与内存管理相关的问题。此外,非直接内存的ByteBuffer在创建和销毁时通常比直接内存的ByteBuffer更快,因为它们是在Java虚拟机的堆内存中分配和回收的。因此,
在进行小量I/O操作或不需要与本地代码进行交互时,非直接内存的ByteBuffer是一个更好的选择。
Channel(通道)
通道(Channel)是一个用于表示可以进行I/O操作的连接或端口的抽象概念。通道可以与缓冲区(Buffer)进行交互,以便在通道和缓冲区之间传输数据。通道的主要特点是它们是非阻塞的,这意味着它们可以在等待I/O操作完成时执行其他任务。
Java NIO中提供了以下几种主要的通道类型:
-
FileChannel:用于文件I/O操作的通道。FileChannel可以将数据从文件中读取到缓冲区,或将数据从缓冲区写入到文件中。
-
SocketChannel:用于TCP网络通信的通道。SocketChannel可以将数据从网络中读取到缓冲区,或将数据从缓冲区写入到网络中。
-
ServerSocketChannel:用于监听TCP连接的通道。ServerSocketChannel可以接受来自客户端的连接请求,并创建一个新的SocketChannel来表示与客户端的连接。
-
DatagramChannel:用于UDP网络通信的通道。DatagramChannel可以将数据从网络中读取到缓冲区,或将数据从缓冲区写入到网络中。
channel常用操作
使用FileChannel进行文件读写操作的代码示例:
 @Test
    public void test4() throws IOException {
        // 创建一个FileInputStream,用于读取文件
        FileInputStream fileInputStream = new FileInputStream("2.txt");
        // 获取FileInputStream的FileChannel
        FileChannel inputChannel = fileInputStream.getChannel();
        // 创建一个FileOutputStream,用于写入文件
        FileOutputStream fileOutputStream = new FileOutputStream("output.txt");
        // 获取FileOutputStream的FileChannel
        FileChannel outputChannel = fileOutputStream.getChannel();
        // 创建一个ByteBuffer,用于存储读取到的数据
        ByteBuffer buffer = ByteBuffer.allocate(1024);
        // 从输入文件中读取数据到ByteBuffer
        while (inputChannel.read(buffer) != -1) {
            // 切换ByteBuffer为写模式
            buffer.flip();
            // 将ByteBuffer中的数据写入到输出文件中
            outputChannel.write(buffer);
            // 清空ByteBuffer,以便再次使用
            buffer.clear();
        }
        // 关闭输入输出通道和文件流
        inputChannel.close();
        outputChannel.close();
        fileInputStream.close();
        fileOutputStream.close();
    }
通过Buffer完成文件复制
 @Test
    public void testCopy() throws IOException {
        FileInputStream fis = new FileInputStream("C:\\Users\\ASUS\\Desktop\\pitesen.pdf");
        FileOutputStream fos = new FileOutputStream("C:\\Users\\ASUS\\Desktop\\maven_test\\maven_java\\newpetersen.pdf");
        FileChannel fisChannel = fis.getChannel();
        FileChannel fosChannel = fos.getChannel();
        ByteBuffer buffer = ByteBuffer.allocate(1024);
        while(true){
            buffer.clear();
            int flag = fisChannel.read(buffer);
            if(flag == -1){
                break;
            }
            buffer.flip();
            fosChannel.write(buffer);
        }
        fisChannel.close();
        fosChannel.close();
    }
分散 (Scatter) 和聚集 (Gather)
分散读取(Scatter ):是指把Channel通道的数据读入到多个缓冲区中去
聚集写入(Gathering )是指将多个 Buffer 中的数据“聚集”到 Channel。
 @Test
    public void testScatterAndGetter() throws IOException {
        RandomAccessFile file1 = new RandomAccessFile("newfile.txt", "rw");
        ByteBuffer buf1 = ByteBuffer.allocate(3);
        ByteBuffer buf2 = ByteBuffer.allocate(1024);
        FileChannel file1Channel = file1.getChannel();
        ByteBuffer []bufs = {buf1,buf2};
        file1Channel.read(bufs);

        for(ByteBuffer buf:bufs){
            buf.flip();
            System.out.println(new String(buf.array(),0,buf.remaining()));
        }
        RandomAccessFile file2 = new RandomAccessFile("2.txt", "rw");
        FileChannel file2Channel = file2.getChannel();
        file2Channel.write(bufs);
    }
transferFrom()
从目标通道中去复制原通道数据
  @Test
    public void testTransferfrom() throws IOException {
        FileInputStream fileInputStream = new FileInputStream("2.txt");
        FileChannel inChannel = fileInputStream.getChannel();
        FileOutputStream fileOutputStream = new FileOutputStream("des.txt");
        FileChannel osChannel = fileOutputStream.getChannel();
        osChannel.transferFrom(inChannel,inChannel.position(),inChannel.size());
        inChannel.close();
        osChannel.close();
    }
transferTo()
把原通道数据复制到目标通道
 @Test
    public void testTransferTo() throws IOException {
        FileInputStream fileInputStream = new FileInputStream("2.txt");
        FileOutputStream fileOutputStream = new FileOutputStream("des2.txt");
        FileChannel inChannel = fileInputStream.getChannel();
        FileChannel outChannel = fileOutputStream.getChannel();
        inChannel.transferTo(inChannel.position(),inChannel.size(),outChannel);
        inChannel.close();
        outChannel.close();
    }
Selector(选择器)
Selector是一个用于实现非阻塞I/O操作的组件。Selector可以检查一个或多个NIO通道(Channel)的状态,例如是否有数据可读、是否可以写入数据等。通过使用Selector,我们可以实现单线程处理多个通道的I/O操作,从而提高系统的性能和可伸缩性。选择器(Selector) 是 SelectableChannle 对象的多路复用器,Selector 可以同时监控多个 SelectableChannel 的 IO 状况,也就是说,利用 Selector可使一个单独的线程管理多个 Channel。Selector 是非阻塞 IO 的核心
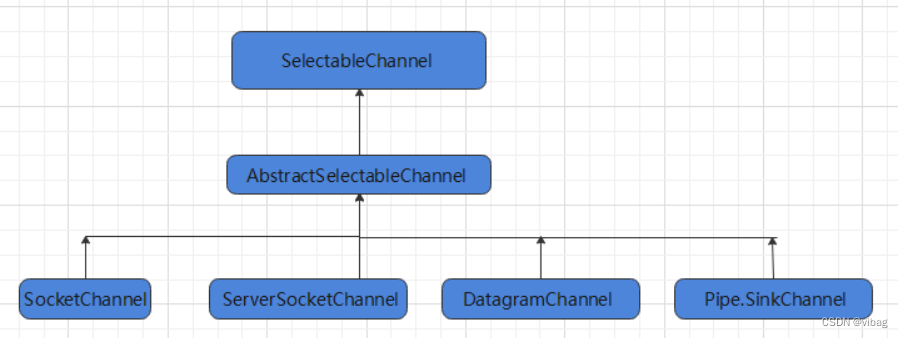
- Java 的 NIO,用非阻塞的 IO 方式。可以用一个线程,处理多个的客户端连接,就会使用到 Selector(选择器)
- Selector 能够检测多个注册的通道上是否有事件发生(注意:多个 Channel 以事件的方式可以注册到同一个
Selector),如果有事件发生,便获取事件然后针对每个事件进行相应的处理。这样就可以只用一个单线程去管
理多个通道,也就是管理多个连接和请求。 - 只有在 连接/通道 真正有读写事件发生时,才会进行读写,就大大地减少了系统开销,并且不必为每个连接都
创建一个线程,不用去维护多个线程 - 避免了多线程之间的上下文切换导致的开销
selector选择器处理流程
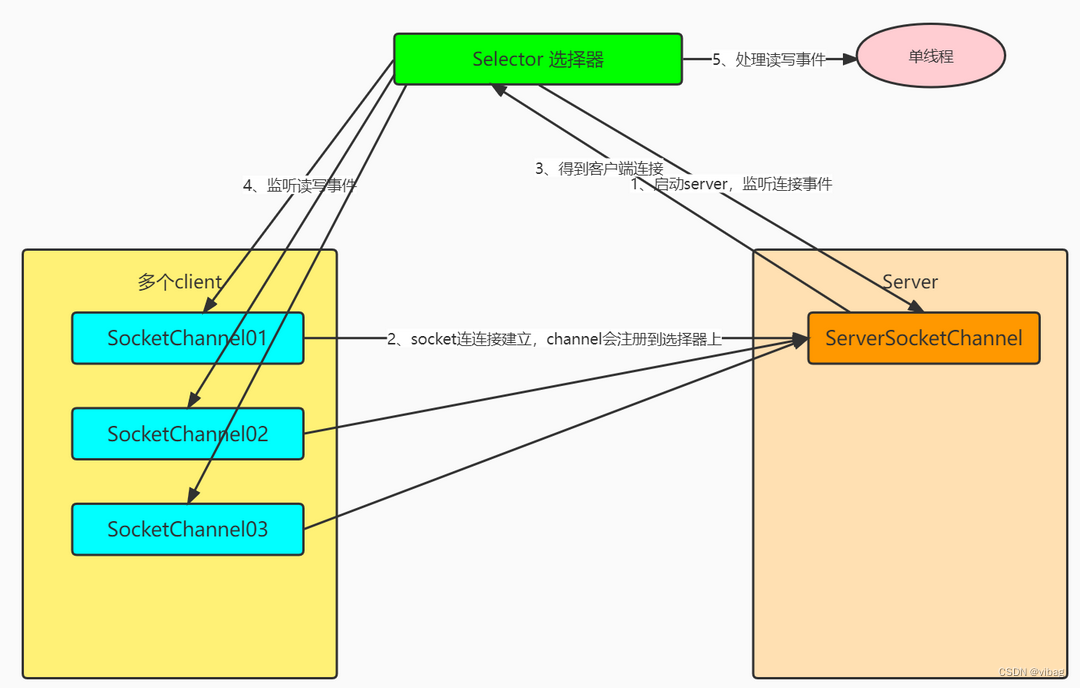 SelectionKey中定义的4种事件

NIO非阻塞式网络通信原理分析
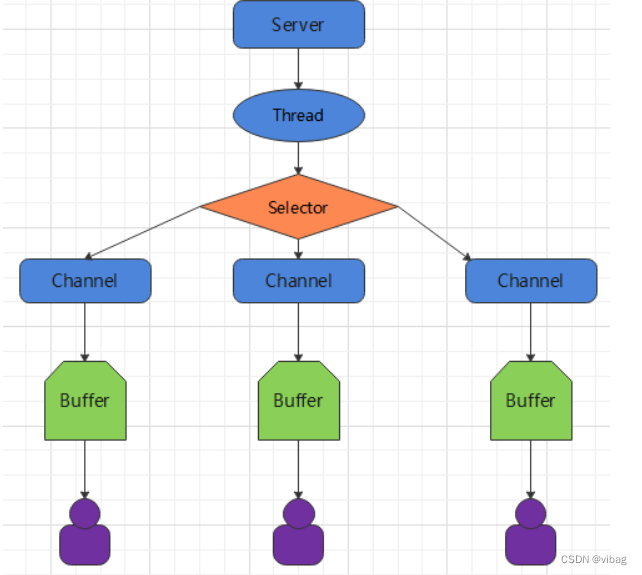
Selector可以实现: 一个 I/O 线程可以并发处理 N 个客户端连接和读写操作,这从根本上解决了传统同步阻塞 I/O 一连接一线程模型,架构的性能、弹性伸缩能力和可靠性都得到了极大的提升。
服务端流程
-
1、当客户端连接服务端时,服务端会通过 ServerSocketChannel 得到 SocketChannel:1. 获取通道
ServerSocketChannel ssChannel = ServerSocketChannel.open(); -
2、切换非阻塞模式
ssChannel.configureBlocking(false); -
3、绑定连接
ssChannel.bind(new InetSocketAddress(9999)); -
4、 获取选择器
Selector selector = Selector.open(); -
5、 将通道注册到选择器上, 并且指定“监听接收事件”
ssChannel.register(selector, SelectionKey.OP_ACCEPT); -
- 轮询式的获取选择器上已经“准备就绪”的事件
  //轮询式的获取选择器上已经“准备就绪”的事件
   while (selector.select() > 0) {
          System.out.println("轮一轮");
          //7. 获取当前选择器中所有注册的“选择键(已就绪的监听事件)”
          Iterator<SelectionKey> it = selector.selectedKeys().iterator();
          while (it.hasNext()) {
              //8. 获取准备“就绪”的是事件
              SelectionKey sk = it.next();
              //9. 判断具体是什么事件准备就绪
              if (sk.isAcceptable()) {
                  //10. 若“接收就绪”,获取客户端连接
                  SocketChannel sChannel = ssChannel.accept();
                  //11. 切换非阻塞模式
                  sChannel.configureBlocking(false);
                  //12. 将该通道注册到选择器上
                  sChannel.register(selector, SelectionKey.OP_READ);
              } else if (sk.isReadable()) {
                  //13. 获取当前选择器上“读就绪”状态的通道
                  SocketChannel sChannel = (SocketChannel) sk.channel();
                  //14. 读取数据
                  ByteBuffer buf = ByteBuffer.allocate(1024);
                  int len = 0;
                      /*
          	 	     返回值:
            		    正数: 表示本地读到有效字节数
             		   0: 表示本次没有读到数据
            		    -1: 表示读到末尾
             */
                  while ((len = sChannel.read(buf)) > 0) {
                      buf.flip();
                      System.out.println(new String(buf.array(), 0, len));
                      buf.clear();
                  }
              }
              //15. 取消选择键 SelectionKey
              it.remove();
          }
      }
  }
客户端流程
-
- 获取通道
SocketChannel sChannel = SocketChannel.open(new InetSocketAddress("127.0.0.1", 9999)); -
- 切换非阻塞模式
sChannel.configureBlocking(false); -
- 分配指定大小的缓冲区
ByteBuffer buf = ByteBuffer.allocate(1024); -
- 发送数据给服务端
Scanner scan = new Scanner(System.in);
  	while(scan.hasNext()){
  		String str = scan.nextLine();
  		buf.put((new SimpleDateFormat("yyyy/MM/dd HH:mm:ss").format(System.currentTimeMillis())
  				+ "\n" + str).getBytes());
  		buf.flip();
  		sChannel.write(buf);
  		buf.clear();
  	}
  	//关闭通道
  	sChannel.close();
非阻塞IO的工作原理
在NIO中,当一个线程执行IO操作时,如果数据当前不可用,线程不会阻塞等待,而是可以继续执行其他任务。当数据准备好后,线程会接到通知,然后处理这些数据。这种方式允许单个线程管理多个网络连接,从而大大提高了系统的并发性和效率。
NIO的使用场景
应用场景:
-
高并发服务器:NIO的多路复用技术使得单个线程能够处理大量的客户端连接,这对于构建高性能的网络服务器非常有用。
-
文件I/O:NIO提供了对文件I/O的优化,包括内存映射文件和文件锁定等功能。
NIO与BIO的区别
- 阻塞与非阻塞:BIO中的线程在等待数据时会阻塞,而NIO中的线程则可以继续执行其他任务。
- 同步与异步:虽然NIO是非阻塞的,但它仍然是同步的,因为数据的读写仍然需要由应用程序线程来完成。真正的异步IO(AIO)允许操作系统在数据准备好后直接调用回调函数,而不需要应用程序线程轮询或等待。
- 性能:NIO由于采用了非阻塞和多路复用技术,通常能够提供更好的性能,特别是在高并发环境下。
NIO网络编程实现群聊系统
- 通过NIO 实现客户端与客户端之间的非阻塞通信
- 服务器端:可以监测客户端上线和下线,并实现将客户端发送过来的消息转发给其他的客户端
- 客户端:通过 channel 可以实现非阻塞的方式发送消息给其它客户端,同时可以接收来自其它客户端发送过来的消息(通过服务端进行转发)
服务端代码实现
public class Server {
	//定义选择器以及通道
    private Selector selector;
    private ServerSocketChannel ssChannel;
    private static final int PORT = 9999;
    public Server() throws IOException {
    //得到通道
        ssChannel = ServerSocketChannel.open();
        //将通道设置为非阻塞模式ssChannel.configureBlocking(false);
		//绑定连接端口
        ssChannel.bind(new InetSocketAddress(PORT));
    	//得到选择器
        selector = Selector.open();
        //将通道注册到选择器上,同时监听接收事件
        ssChannel.register(selector, SelectionKey.OP_ACCEPT);
    }
    //服务端监听事件
    public void listen(){
        System.out.println("监听线程:"+Thread.currentThread().getName());
            try {
            //获取可以用的通道
               while(selector.select() > 0){
                    System.out.println("开始一轮事件处理");
                    //监听事件的迭代器
                    Iterator<SelectionKey> it = selector.selectedKeys().iterator();
                    //遍历已经准备好的事件
                    while(it.hasNext()){
                        SelectionKey key = it.next();
                        //若事件是可接收事件
                        if(key.isAcceptable()){
                            //获取客户端的通道
                            SocketChannel schannel = ssChannel.accept();
                            //将通道设置为非阻塞模式
                            schannel.configureBlocking(false);
                            System.out.println(schannel.getRemoteAddress()+"上线了");
                            //将客户端通道往选择器上注册读数据事件
                            schannel.register(selector,SelectionKey.OP_READ);
                        }
                        //若事件是读取数据事件
                        else if(key.isReadable()){
                            //处理读取数据的事件
                            readData(key);
                        }
                        //移除当前事件
                        it.remove();
                    }
                }
            }catch (IOException e) {
                e.printStackTrace();
            }

    }
		//读取客户端发送过来的消息
    private void readData(SelectionKey key) {
        SocketChannel schannel = null;
            try {
            		//通过key获取通道
                schannel = (SocketChannel)key.channel();
              	//创建ByteBuffer
                ByteBuffer buffer = ByteBuffer.allocate(1024);
                //根据len的值读取数据
                int len = schannel.read(buffer);
                if(len > 0){
                //切换为读模式
                    buffer.flip();
                //将buffer中的数转换成字符串
                    String msg = new String(buffer.array());
                    System.out.println("from 客户端:"+msg);
                   //将该客户端发送过来的消息转发给其他的客户端
                    sendInfoToOtherClients(msg, schannel);
                }
            } catch (IOException e) {
                try {
                    System.out.println(schannel.getRemoteAddress()+"离线了");
                    //取消该事件的监听
                    key.cancel();
                    //关闭该通道
                    schannel.close();
                } catch (IOException ex) {
                    ex.printStackTrace();
                }
        }
    }
	//将消息转发该除self之外的其他客户端
    private void sendInfoToOtherClients(String msg, SocketChannel self) throws IOException {
        System.out.println("服务器转发消息中...");
        System.out.println("服务器转发数据给客户端线程: " + Thread.currentThread().getName());
         //遍历selector上的key
        for(SelectionKey key:selector.keys()){
        //通过key获取对应的通道
           Channel targetChannel = key.channel();
          //排除self客户端本身自己
           if(targetChannel instanceof SocketChannel && targetChannel != self){
           //将通道转化成socketChannel
               SocketChannel socketChannel = (SocketChannel)targetChannel;
            //将消息msg存储到ByteBuffer中
               ByteBuffer wrap = ByteBuffer.wrap(msg.getBytes());
               //将ByteBuffer中的数据写入socketChannel中
               socketChannel.write(wrap);
           }
        }
    }

    public static void main(String[] args) throws IOException {
        //创建server服务端对象
        Server server = new Server();
        //服务端启动监听
        server.listen();
    }
}
客户端代码实现
public class Client {
	//定义主机及端口等信息
    private final String HOST = "127.0.0.1";
    private final int PORT = 9999;
    private Selector selector;
    private SocketChannel socketChannel;
    private String userName;
    //客户端初始化
    public Client() throws IOException {
    	//获取选择器
        selector =Selector.open();
        //连接服务器,获取通道
        socketChannel = SocketChannel.open(new InetSocketAddress(HOST,PORT));
        //将通道设置为非阻塞模式
        socketChannel.configureBlocking(false);
        //将通道注册到selector上,同时监听读事件
        socketChannel.register(selector,SelectionKey.OP_READ);
        //客户端名称
        userName = socketChannel.getLocalAddress().toString().substring(1);
        System.out.println(userName+"已经准备好了...");
    }
    //发送消息给服务器
    public void sendInfo(String info){
        try {
            info = userName+"说: "+info;
            //将消息写入通道
            socketChannel.write(ByteBuffer.wrap(info.getBytes()));
        } catch (IOException e) {
            e.printStackTrace();
        }
    }
    //读取服务器发送过来的消息
    public void raedInfo(){
        try {
            int readChannnels = selector.select();
            //获取可用的通道
            if(readChannnels > 0){
                Iterator<SelectionKey> iterator = selector.selectedKeys().iterator();
                while(iterator.hasNext()){
                    SelectionKey key = iterator.next();
                    //通过key获取对应的通道
                    SocketChannel sc = (SocketChannel)key.channel();
                    //创建ByteBuffer
                    ByteBuffer buffer = ByteBuffer.allocate(1024);
                    //将通道的消息读到缓冲区
                    sc.read(buffer);
                    String msg = new String(buffer.array());
                    System.out.println(msg.trim());
                }
                //移除当前已经处理完成的是事件
                iterator.remove();
            }
        } catch (IOException e) {
            e.printStackTrace();
        }

    }

    public static void main(String[] args) throws IOException {
        //创建客户端
        Client client = new Client();
        //启动读数据的线程,每隔2秒读取一次
        new Thread(()->{
            while(true){
                client.raedInfo();
                try {
                    Thread.sleep(2000);
                } catch (InterruptedException e) {
                    e.printStackTrace();
                }
            }
        }).start();
        Scanner scanner = new Scanner(System.in);
        while(scanner.hasNextLine()){
            String msg = scanner.nextLine();
            //将消息发送给服务端
            client.sendInfo(msg);
        }
    }
}
AIO
Java AIO(NIO 2.0)异步非阻塞,服务器实现模式为一个有效请求一个线程,客户端的I/O请求都是由操作系统先完成了再通知服务器应用去启动线程进行处理,与NIO不同,当进行读写操作时,只须直接调用API的read或write方法即可,这两种方法均为异步的,对于读操作而言,当有流可读取时,操作系统会将可读的流传入read方法的缓冲区,对于写操作而言,当操作系统将write方法传递的流写入完毕时,操作系统主动通知应用程序.

即可以理解为,read/write方法都是异步的,完成后会主动调用回调函数。在JDK1.7中,这部分内容被称作NIO 2.0,主要在Java.nio.channels包下增加了下面四个异步通道:
AsynchronousSocketChannel
AsynchronousServerSocketChannel
AsynchronousFileChannel
AsynchronousDatagramChannel
BIO、NIO、AIO 适用场景分析
1、BIO 方式适用于连接数目比较小且固定的架构,这种方式对服务器资源要求比较高,并发局限于应用中,JDK1.4以前的唯一选择,但程序简单易理解。
2、NIO 方式适用于连接数目多且连接比较短(轻操作)的架构,比如聊天服务器,弹幕系统,服务器间通讯等。
编程比较复杂,JDK1.4 开始支持。
3、AIO 方式使用于连接数目多且连接比较长(重操作)的架构,比如相册服务器,充分调用 OS 参与并发操作,
编程比较复杂,JDK7 开始支持。

![[蓝桥杯2024]-PWN:fd解析(命令符转义,标准输出重定向)](https://img-blog.csdnimg.cn/direct/fe37ee3eed4841558d05d5ad0f674fc9.png)
